Objective
You may need to configure Additional IP addresses on your instances, for example if you are hosting multiple websites or international services. UniqWebHost Additional IPs allow you to associate multiple IP addresses with a single network interface.
This guide explains how to add Additional IP addresses to your network configuration.
This guide is designed to assist you in common tasks as much as possible. Nevertheless, we recommend that you contact a specialist service provider if you have difficulties or doubts concerning the administration, usage or implementation of services on a server.
Requirements
- A VPS/Server in your UniqWebHost account
- An Additional IP address or an Additional IP block
- Administrative access (root) via SSH or GUI to your instance
- Basic networking and administration knowledge
Instructions
The following sections contain the configurations for the most commonly used distributions/operating systems. The first step is always to log in to your instance via SSH or a GUI login session (VNC for a Windows instance). The examples below presume you are logged in as a user with elevated permissions (Administrator/sudo).
Please take note of the following terminology that will be used in code examples and instructions of the guide sections below:
| Terms | Description | Examples |
| ADDITIONAL_IP | An Additional IP address assigned to your service | 169.254.10.254 |
| NETWORK_INTERFACE | The name of the network interface | eth0, ens3 |
| ID | ID of the IP alias, starting with 0 (depending on the number of additional IPs there are to configure) | 0, 1 |
Debian 11
Step 1: Disable automatic network configuration
Open the following file path with a text editor:
sudo nano /etc/cloud/cloud.cfg.d/99-disable-network-config.cfgEnter the following line, then save and exit the editor.
network: {config: disabled}Creating this configuration file will prevent changes to your network configuration from being made automatically.
Step 2: Edit the network configuration file
You can verify your network interface name with this command:
ip aOpen the network configuration file for editing with the following command:
Then add the following lines:
Step 3: Restart the interface
Apply the changes with the following command:
Ubuntu 22.04 & Debian 12
The configuration file for your Additional IP addresses is located in /etc/netplan/. In this example it is called "50-cloud-init.yaml". Before making changes, verify the actual file name in this folder. Each Additional IP address will need its own line within the file.
Step 1: Disable automatic network configuration
Open the following file path with a text editor:
Enter the following line, then save and exit the editor.
You can verify your network interface name with this command:
Open the network configuration file for editing with the following command:
Do not change the existing lines in the file; add your Additional IP address according to the example below:
Save and close the file.
Step 3: Apply the new network configuration
You can test your configuration using this command:
Windows Server (2016)
Log in to the UniqWebHost Control Panel, select your server, and click on console.
Step 1: Verify the network configuration
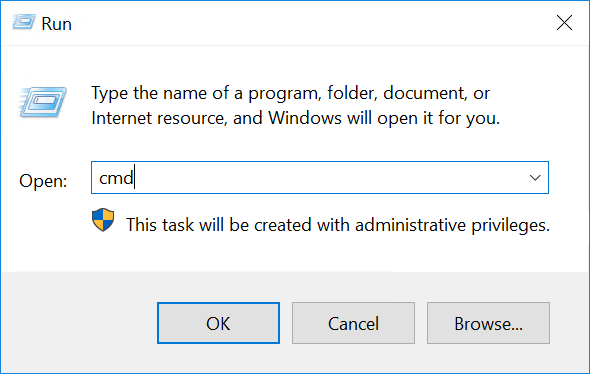
Right-click on the Start Menu button and open Run.
Type cmd and click OK to open the command line application.
In order to retrieve the current IP configuration, enter ipconfig at the command prompt.
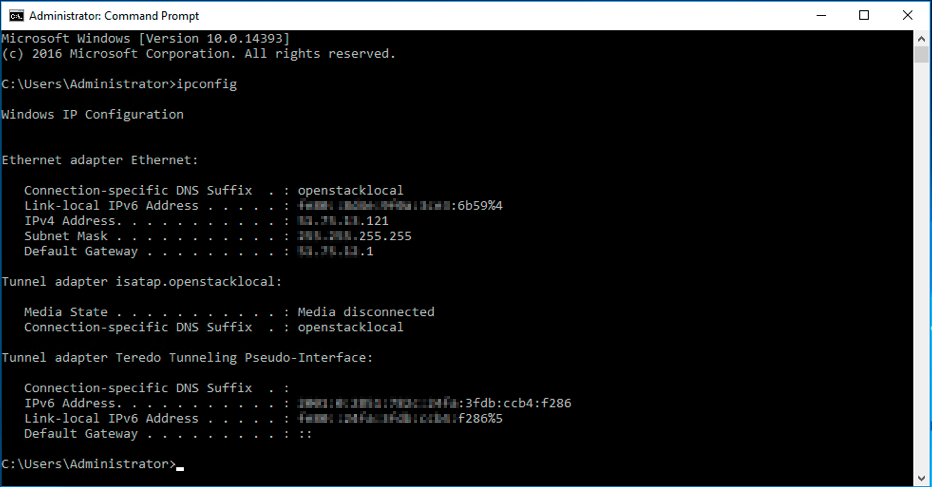
Step 2: Change the IPv4 Properties
Now you need to change the IP properties to a static configuration.
Open the adapter settings in the Windows control panel and then open the Properties of Internet Protocol Version 4 (TCP/IPv4).
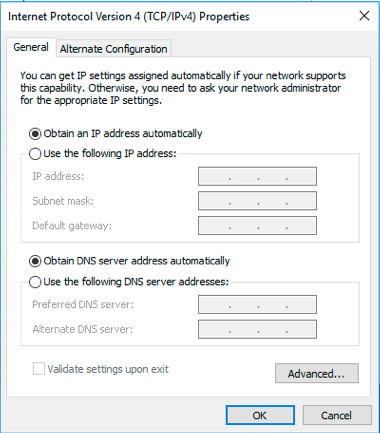
In the IPv4 Properties window, select Use the following IP address. Enter the IP address which you have retrieved in the first step, then click on Advanced.
Step 3: Add the Additional IP in the "Advanced TCP/IP Settings"
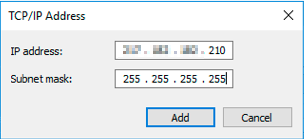
In the new window, click on Add... under "IP addresses". Enter your Additional IP address and the subnet mask (255.255.255.255).
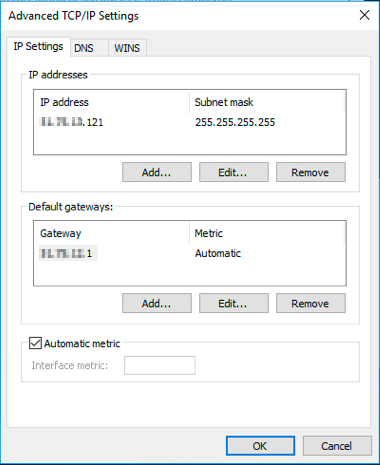
Confirm by clicking on Add.
Step 4: Restart the network interface
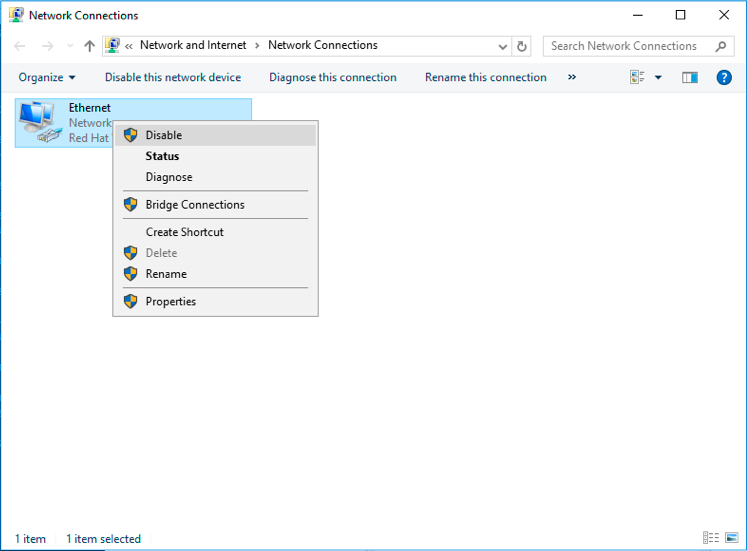
Back in the control panel (Network Connections), right-click on your network interface and then select Disable.
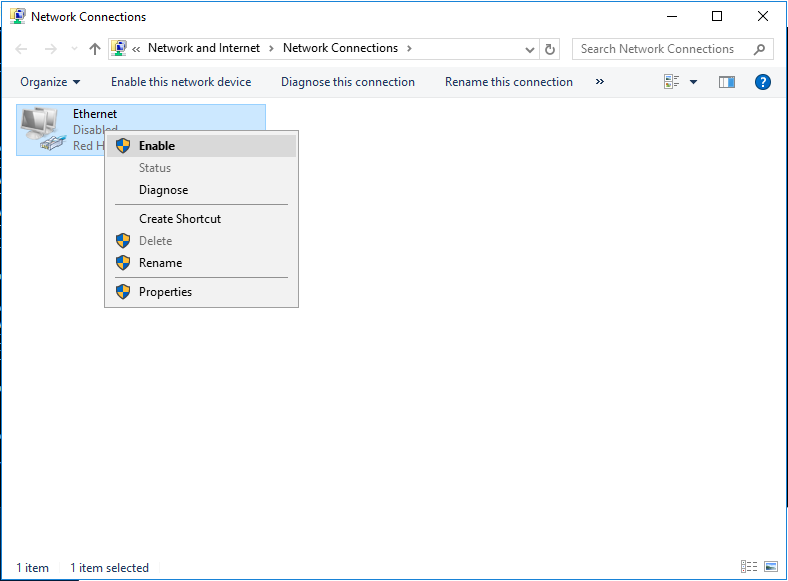
To restart it, right-click on it again and then select Enable.
Step 5: Check the new network configuration
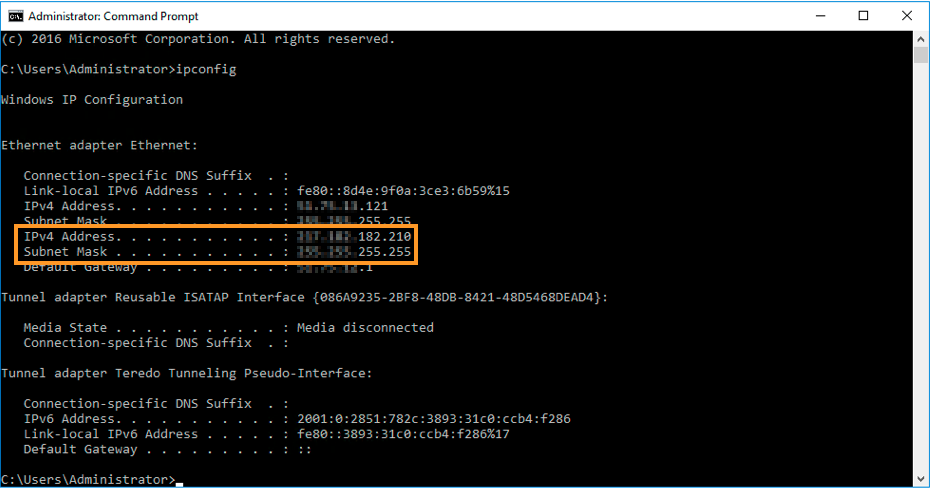
Open the command prompt (cmd) and enter ipconfig. The configuration should now include the new Additional IP address.
cPanel (CentOS 7) / Red Hat derivatives
Step 1: Edit the network configuration file
You can verify your network interface name with this command:
ip aOpen the network configuration file for editing:
Step 2: Restart the interface
Apply the changes with the following command:
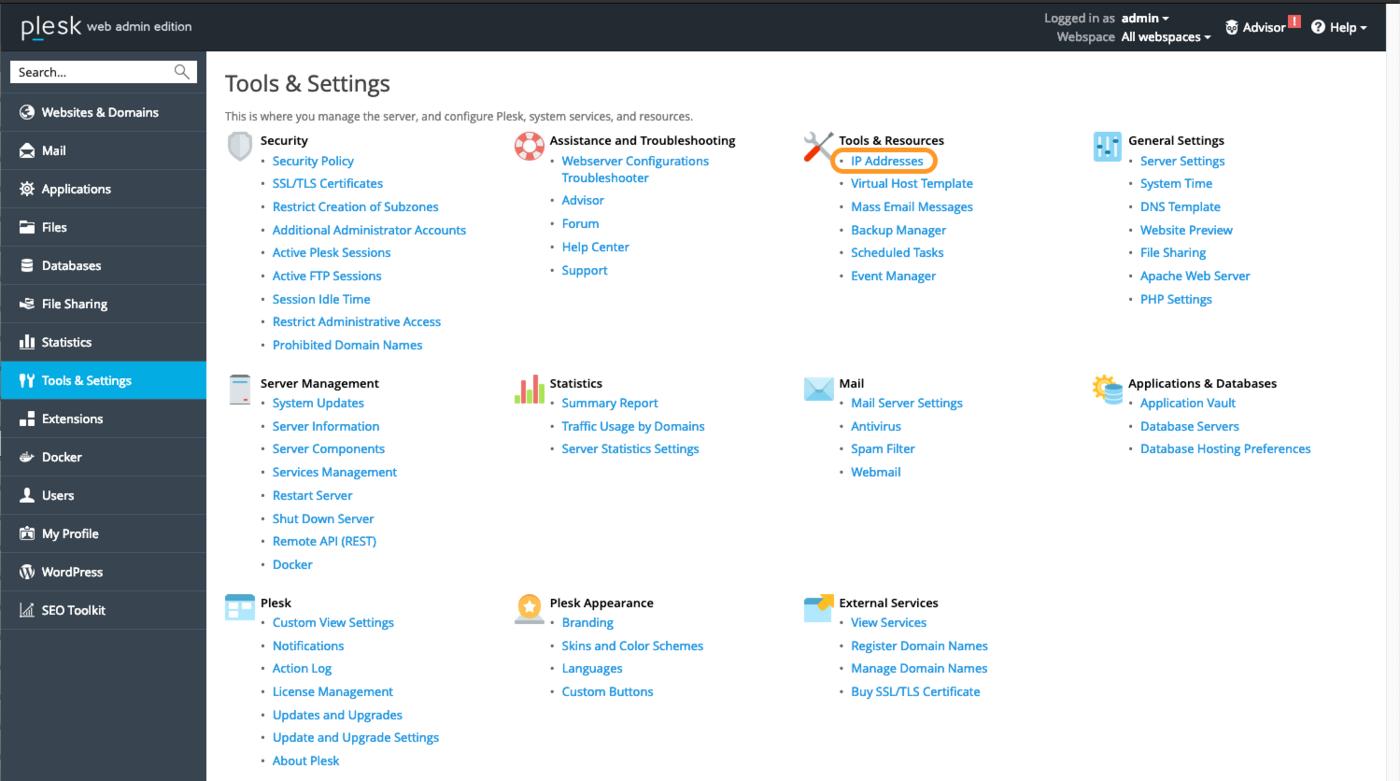
Click on IP Addresses under Tools & Resources.
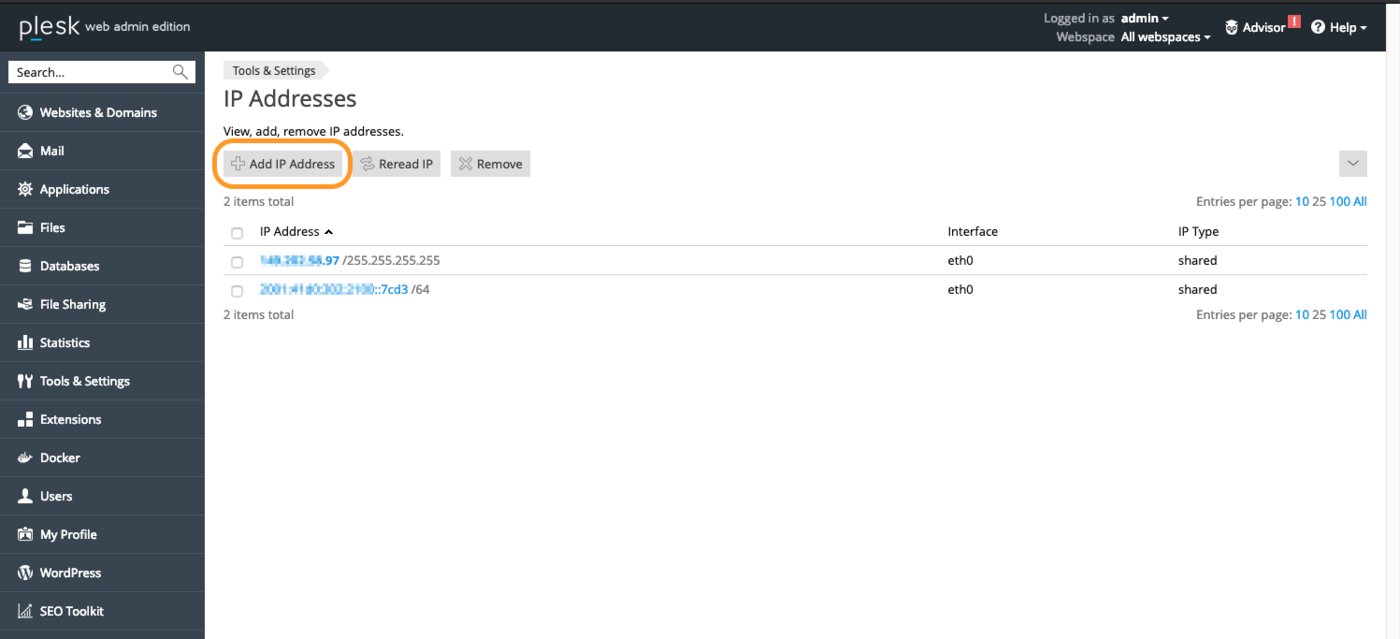
Step 2: Add the additional IP information
In this section, click on the button Add IP Address.
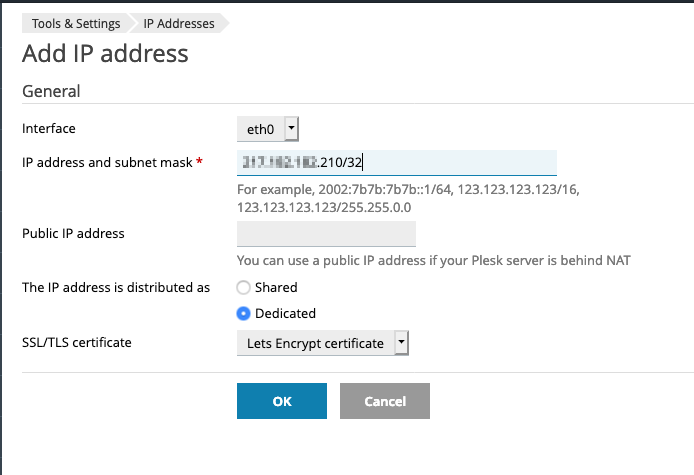
Enter your Additional IP in the form xxx.xxx.xxx.xxx/32 into the field "IP address and subnet mask", then click on OK.
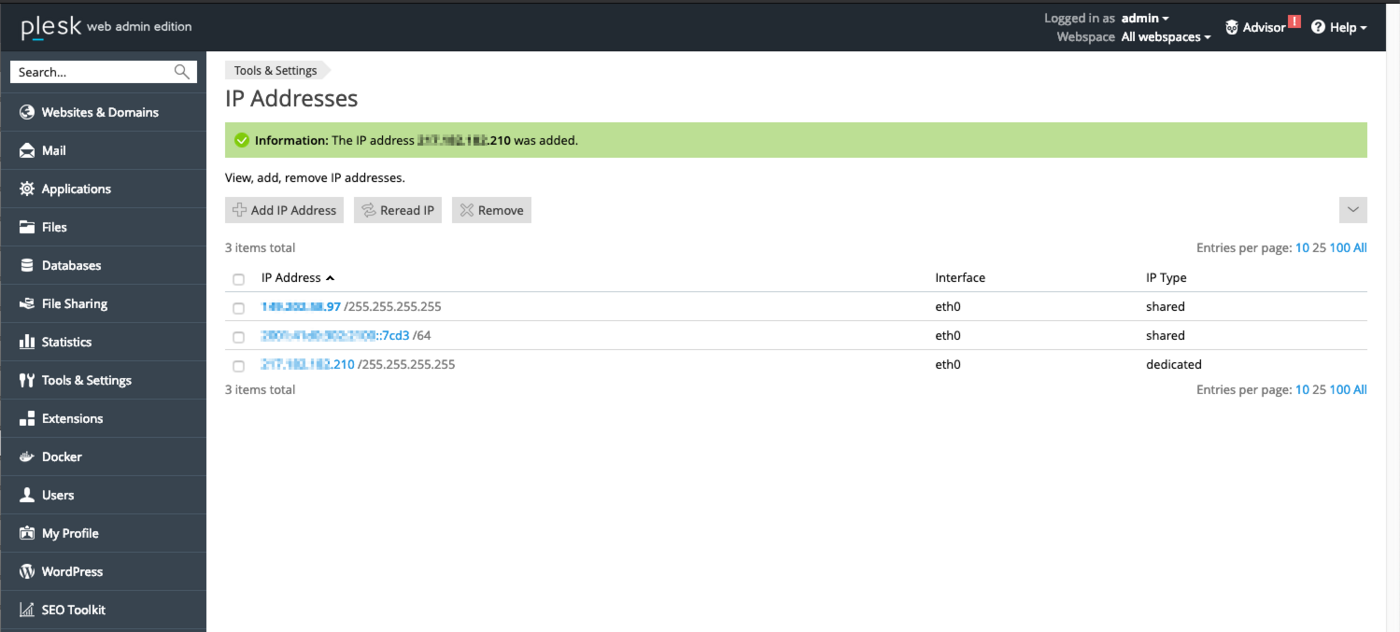
Step 3: Check the current IP configuration
Back in the section "IP Addresses", verify that the Additional IP address was added correctly.
Troubleshooting
First, soft-reboot your instance via the instance's OS or from the UniqWebHost Control Panel. If you are still unable to establish a connection from the public network to your Additional IP and suspect a network problem, you need to reboot the instance in rescue mode. Then you can set up the Additional IP address directly on the instance.
Once you are connected in rescue mode via SSH, enter the following command:
ifconfig ens3:0 ADDITIONAL_IP netmask 255.255.255.255 broadcast ADDITIONAL_IP upTo test the connection, simply ping your Additional IP from the outside. If it responds in rescue mode, that probably means that there is a configuration error.